When you’re itching to spill your thoughts onto a digital page, that’s when you know it’s time to consider creating a blog. You may write for fun or wish to share expertise on a niche
topic—either way, you want to engage new readers or customers with killer content.
Having great ideas and a knack for talking with your audience isn’t enough. You need the right tools to prepare a digital stage from which you’ll speak to your readers.
Don’t go the extra mile alone: React JS is a powerful library to craft a unique and fancy blog that will rock search engines. If you already have a great idea in mind, get in touch with Rubyroid Labs. We’re a highly-rated React JS development company on Clutch with 40 five-star reviews. Our stellar portfolio involves over 300 projects—let’s add yours next!
Want to know how to build a blog using React JS? Keep reading!
Contents:
- Is React Good or Overkill for Your Blog?
- Is React JS a Solid Fit For Your Blog?
- Is React Poor for SEO?
- Best SEO Practices to Elevate Your Blog in React
- How Do You Create a Blog in React JS?
- How LLMs Simplify Creating Your Blog
- React vs. WordPress: Which One Is Better?
- Best Blogs Created on JavaScript That You Can Follow
- The Bottom Line
Is React Good or Overkill for Your Blog?
Building a blog with React JS might seem excessive, but that’s only at first glance.
React is a robust JavaScript library for crafting large and complex websites and applications rich in interactive elements.
This JavaScript library, created by Meta to help developers build user interfaces (UIs), operates backstage in numerous apps that many people can’t imagine their ordinary day without (Instagram, Facebook, Netflix, Google Maps, and many more.)
You can be a small business owner who strives for business growth, with your website and blog evolving alongside it. When you decide to use React JS from the beginning, where your blog is all about simple static content, you make a strategic choice. React offers a solid foundation for the moment you’re ready to transition to a blog with dynamic navigation, search functionality, animation, and so forth.
You can run a well-established business and plan on having a thoughtfully designed blog to support that business, one with an aesthetically unique look and feel to impress and lure customers. Is React the way to go about this? Absolutely!
Is React JS a Solid Fit For Your Blog?
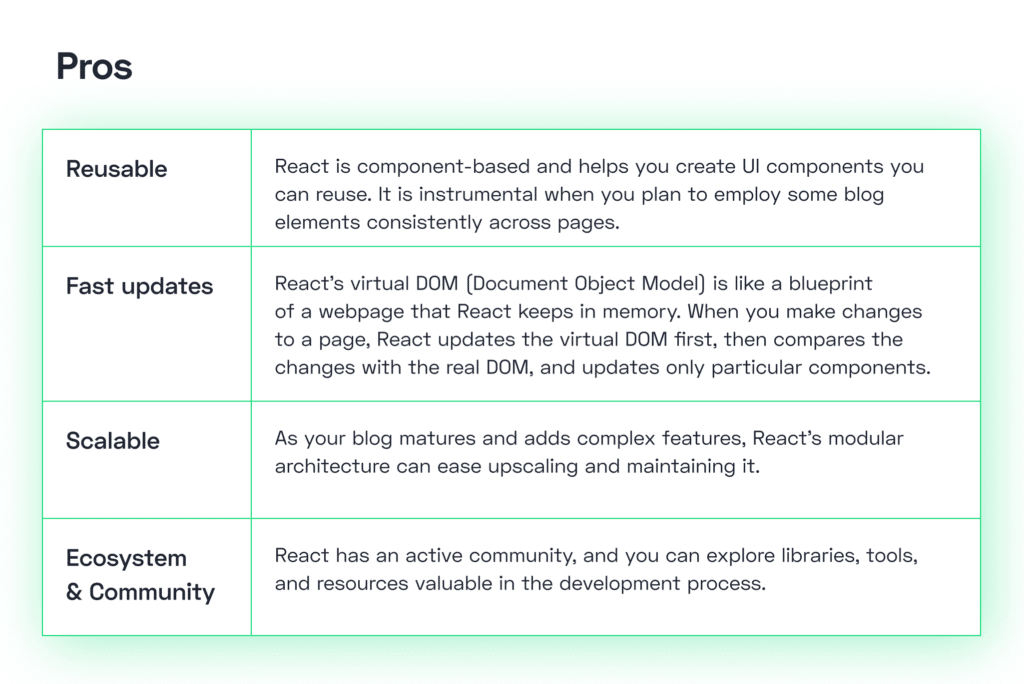
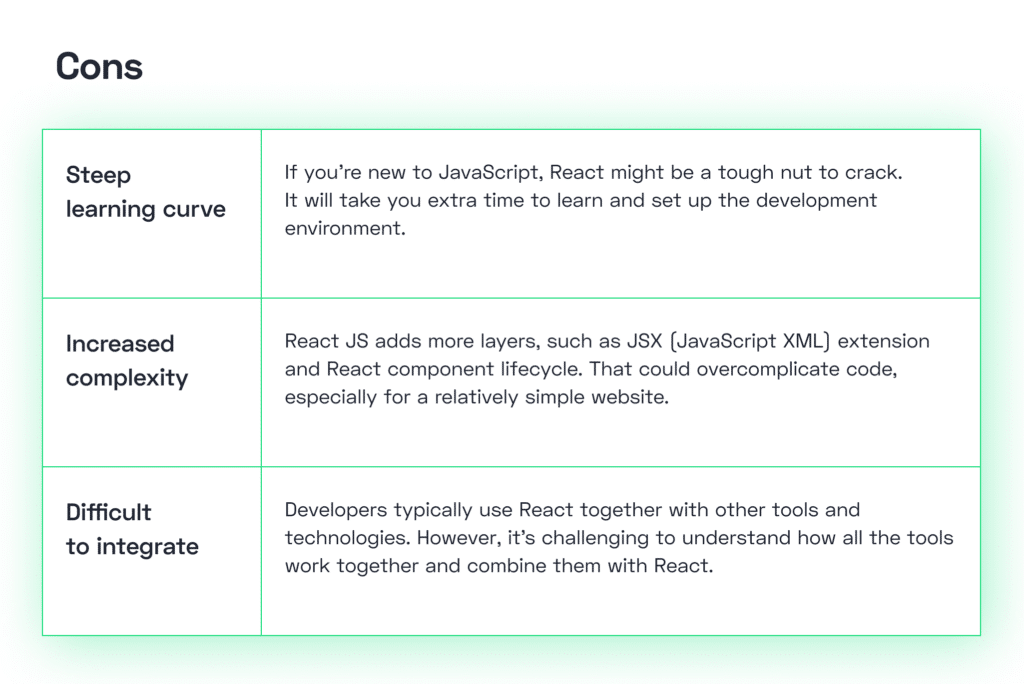
React JS may seem like a double-faceted choice for crafting your blog. To dispel possible doubts, let’s see what pros and cons come with React.


React JS is reusable and scalable, although its steep learning curve makes it the best fit for teams with experienced JavaScript developers and businesses that aim for more advanced websites. Weigh your business objectives and technical capabilities and see if React is the right choice for you, whether you’re at the helm of a tech giant or a startup.
Is React Poor for SEO?
You want your blog to be searchable and for search engines to index it properly. At the stage of creating the blog, you can already lay down a robust basis for successful SEO (search engine optimization.)
React is a great library for crafting a blog with SEO in mind. It works with NodeJS and Express for backends that enable server-side rendering (SSR): code is run on the server first, eliminating the need to wait for all the files to download before launching the page (like with client-side rendering).
That means your page load time will improve, and search engines will be able to show blog content to users without waiting for React to load.
Best SEO Practices to Elevate Your Blog in React
Here are some valuable tips you may consider to help your blog rank higher:
Use Meta Tags and Title Tags
Set relevant meta tags for each blog post and help search engines find them. Also, create compelling and concise title tags using relevant keywords.
Create Actionable 404 Pages
Think about how your 404 (not found) pages can be helpful or entertaining for users. What we mean by this is that you can take a creative approach and also include links to relevant content and product/service pages.
Post SEO-Friendly URLs
Use descriptive URLs that are rich in keywords and avoid unnecessary parameters. For example, /blog/react-to-create-blog will work better than /blog?id=123.
Generate XML Sitemaps
To boost your blog’s visibility, consider creating a sitemap that includes all relevant URLs (blog posts, categories, and tags) and submit it to search engines via Google Search Console.
Lead With Mobile-First Design
Most of your users will read the blog on their mobile gadgets, and Google also prefers mobile-first indexing. Make sure your blog is just right for both machines and humans.
Use Semantic HTML
Remember to use such HTML elements as , , and to structure your blog content. You need them to help machines understand the context.
Optimize Rendering
React’s server-side rendering (SSR) makes a blog more visible and accessible for search engine crawlers. With SSR, content in HTML format is ready for engines to parse and index, which means React-powered websites rank higher in search results and drive more organic traffic.
How Do You Create a Blog in React JS?
To create a blog using JavaScript, you need the right tools and a bit of code—it’s totally doable, and we’ll walk you through everything necessary to do it the right way.
Let’s break this down in steps, starting with NodeJS for the backend (you need a framework to pair with the React library) and HTML/CSS/JavaScript for the frontend (to display your blog content).
Make sure you have NodeJS, a full-stack React framework, installed on your system, or download it here.
Step 1: Set Up a New Project
Using NodeJS, you can create a blog of any size with static and/or dynamic content. To start a new project, open your terminal and execute these commands:
mkdir react-js-blog
cd react-js-blog
npm init -y
You will see a new directory named react-js-blog where you can start tailoring your blog.
Step 2: Install Dependencies
You need Express, a fast web framework for NodeJS, to work with server-side logic. The Babel libraries allow Webpack to convert JSX code into code the browser understands. The html-webpack-plugin is a Webpack plugin that allows adding JavaScript code to an HTML file.
Using Node Package Manager (npm), run this command to install them:
npm install express
npm install -D @babel/preset-env @babel/preset-react babel-loader webpack webpack-cli html-webpack-plugin
These dependencies will let you handle the backend, including routes, serve static files, and render dynamic viewing.
Also, you need to configure Webpack with two configurations, one for the Express server and one for the React application.
The server configuration will look at the ‘./src/express-server/server.jsx‘ file, while the client configuration will point to ‘./src/react-client/index.jsx‘ file.
Step 3: Set up the Development Environment for React
Install the React library to easily build the user interface and ReactDOM package to let React interact with Document Object Model (DOM) in web browsers.
Set up these dependencies for your project using npm:
npm install react react-domNow you can create interactive elements for your blog, such as a live search bar, dynamic sidebar widgets, or a comment form.
Step 4: Create Your Server
With Express and JSON API, you can create a server for your blog. Use Node Package Manager (npm) again and run this command to install them:
mkdir src
cd src
mkdir express-server
In the src/express-server directory of your project, create a file named server.jsx. This file will set up your Express server.
import express from 'express';
import ReactDOMServer from 'react-dom/server';
import App from '../react-client/components/App';
import fs from 'fs';

const app = express();
app.use('/static', express.static(__dirname));
const PORT = 5000;

const createReactApp = async (location) => {
  const reactApp = ReactDOMServer.renderToString(
	<App />
  );
  const html = await fs.promises.readFile(`${__dirname}/index.html`, 'utf-8');
  const reactHtml = html.replace(
	'<div id="root"></div>', `<div id="root">${reactApp}</div>`);
  return reactHtml;
};

app.get('*', async (req, res) => {

  const indexHtml = await createReactApp(req.url);
  res.status(200).send(indexHtml);
});

app.listen(PORT, () => {
    console.log(`Server running on http://localhost:${PORT}`);
});
Step 5: Enhance Your Project Structure
You need an optimal directory structure to organize your project and, as a result, build a blog that will function properly. For example, the structure might involve:
- /src/express-server/server.js (Here, you write code; it uses ExpressJS to handle server-side, for example, to show a blog post to a visitor.)
- src/react-client/components (Here, you keep templates to generate dynamic content for your blog)
- /src/react-client/pages (Here, you have your page-level components for different sections of your blog)
You’ve got the idea. Add every necessary component to saturate your blog with engaging and valuable content.
Step 6: Create the Frontend
cd src
mkdir react-client
cd react-client
Inside your project folder, create a public folder. This is where your static assets like HTML, CSS, and JavaScript files will live.
Set up your basic HTML file (index.html):
In the public folder, create an index.html file. This HTML file is the entry point for your blog’s frontend.
<!DOCTYPE html>
<html lang="en">
<head>
    <meta charset="UTF-8">
    <meta name="viewport" content="width=device-width, initial-scale=1.0">
    <title>Simple Blog</title>
</head>
<body>
    <div id="root"></div>

</body>
</html>
In this HTML file, the <div id=”root”></div> element is where your React blog will be rendered.
This HTML file has some simple boilerplate code and a div element with the id root. The div element will hold your React application.
Now, let’s create the index.jsx file:
import React from 'react';
import {hydrateRoot} from 'react-dom/client';
import App from './components/App';
hydrateRoot(document.getElementById('root'),
<React.StrictMode>
<App />
</React.StrictMode>);
(hydrateRoot adds React functionality to the static HTML that the server generates.)
After that, fill in the App component:
mkdir components
cd components

And create App.jsx file:

const App = () => {
  return (
	<main>
  		<section>
			<h2>First blog post</h2>
			<p>Lorem ipsum dolor sit amet, consectetur adipiscing elit</p>
		</section>
	</main>
  );
};
export default App;
Step 7: Style Your Blog
Add a style.css file in the public directory to elevate your blog’s look. You can import components from popular libraries such as Material-UI (MUI), Semantic UI React, and more to style your blog.
Step 8: Run Your Blog
It’s time to reap the fruits of your work.
To start the server, run this in your terminal: rm -rf ./dist && webpack –config webpack.config.cjs && node ./dist/server.cjs.
To view your blog, open a web browser and go to http://localhost:5000.
Step 9: Test Everything
Before putting the final result in front of the customer’s eyes, carefully test all functions: view blog posts, text navigation between pages, and how errors get handled.
Make sure the blog is easy to follow and works great for different devices and screen sizes.
Step 10: Refine and Optimize
If you detect issues or imperfections that escaped your attention before, refactor your code and add additional features. Check to ensure your blog is optimized for performance and if its security is up to par.
If you are unsure how to approach the intricacies of creating a blog from scratch, we’ve got you covered. Get in touch — we’ll estimate your project and handle all the work from beginning to end.
How LLMs Simplify Creating Your Blog
It would be out of step with current trends to not mention the role LLMs (large language models) are playing these days. When you need to create a blog using React JS but lack the skills and expertise, or need to implement a complex feature and have doubts about how to approach this task, AI-based services and tools are at your service.
The easiest option at hand is ChatGPT. Per your request, it can guide you on how to integrate external services, generate React components, as well as basic blog layouts (including header, footer, and post listing components.)
You can prompt ChatGPT with instructions like, “Create a React component for displaying blog posts,” “Generate a navigation bar with links,” or “Tell me the best way to include social sharing buttons.”
AI-driven assistants can also help you create meta descriptions and title tags and choose relevant keywords for your blog posts. You can gain useful recommendations for structuring your blog and optimizing its performance.
React vs. WordPress: Which One Is Better?
WordPress is a content management system (CMS) that is to a website builder what a Swiss Army knife is to a tourist—a one-size-fits-all solution you can use to create and manage a blog. It’s free and open-source, and its simple learning curve is one of the reasons why WP websites are running on roughly 43% of the web.
Using WordPress’s nifty dashboard, you can manage all blog content, add new pages, and tweak your blog’s design. You can also play with a wide variety of available plugins, matching your blog to the vibe of your brand.
In the other corner, there is React JS. This open-source JavaScript library is excellent for building UIs and can breathe interactivity into the simplest of blogs. React doesn’t come with a ready-to-go CMS; however, it does give you extra freedom with the design and dynamism of a blog.
You can pair React up with multiple libraries and create your own set of web development tools. React’s secret weapon is the React Native library, which is perfect for creating mobile apps for iOS and Android.
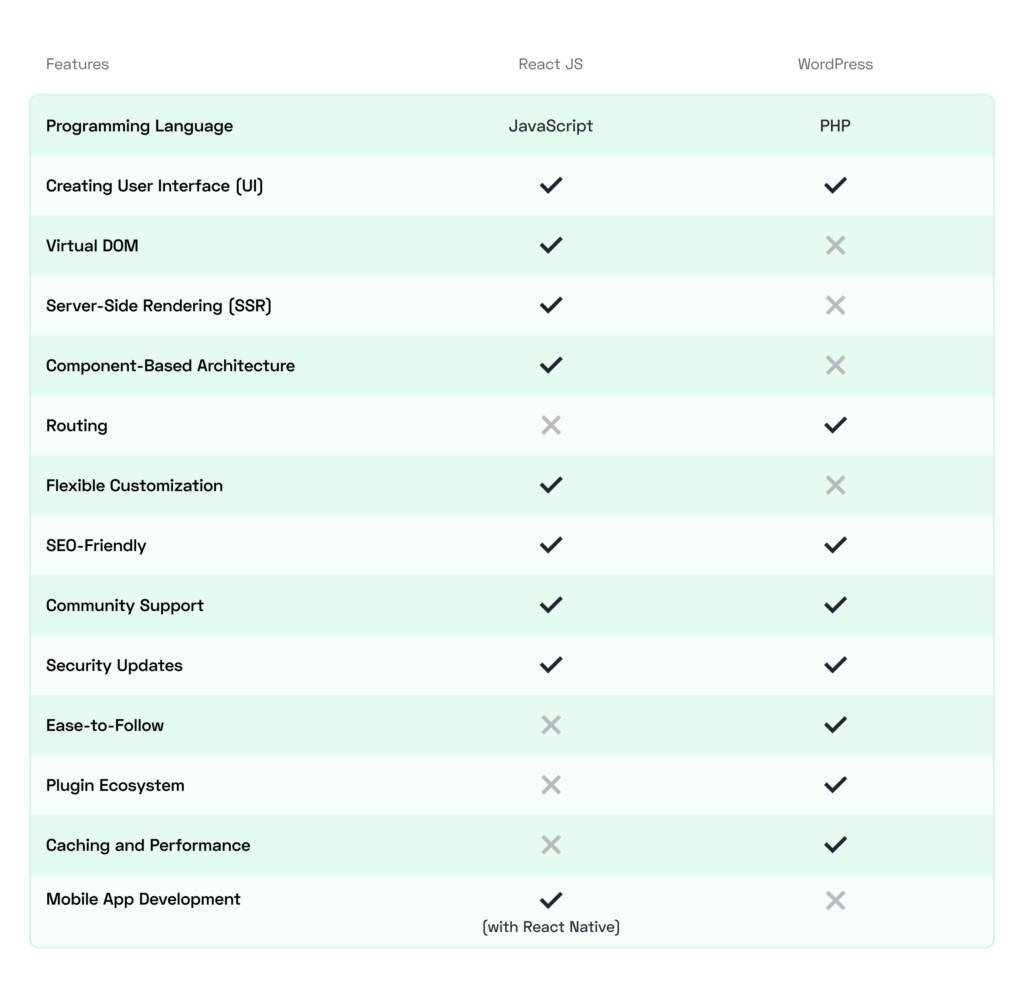
React and WordPress both have their advantages and limitations, which you can learn from the table below.

If your business is in its initial stages, and you expect moderate traffic, it’s fine to settle for WordPress and create a simple yet engaging blog featuring diverse content.
If you’re running a middle- or enterprise-sized business, React JS can help you with complex user interfaces and interactive features for your blog. For example, by using React, you can craft an e-commerce blog with dynamic product showcases or a tech blog with code snippets and interactive demos.
Are you planning on a web application to better engage customers? Explore our ReactJS development services or contact us for personalized assistance.
Best Blogs Created on JavaScript That You Can Follow
To help kick off your blog writing on ReactJS you might seek inspiration and learn from the experience of a few highly successful blogs currently relying on JavaScript.
Here are a handful of examples that underscore how JavaScript can work its magic in creating blogs that readers love.
A colossus among internet forums, Reddit is a network of communities where users can discuss almost any imaginable subject. It uses JavaScript for dynamic content loading, comments, and user interactions. JavaScript here helps users seamlessly interact with content on the vibrant platform.
Medium
This amazing platform is meant for users to share stories and ideas with the world. Bloggers can publish articles on Medium, follow like-minded writers, and deepen their knowledge of various topics. Medium leverages JavaScript for its frontend interface, making the reading and writing journey pleasant for users. JS also enables such dynamic elements as interactive menus, smooth scrolling, and real-time updates, which make the platform easy to use.
CNN
CNN is the world’s largest news website, built using JavaScript to deliver dynamic news updates and multimedia content. This media corporation wants its audiences to not only stay on top of breaking news and events worldwide but also enjoy an immersive experience while interacting with the platform. JS helps with all of that, standing behind dynamic refreshes of news content, multimedia elements, and user engagement features.
Hacker Noon
Geeks, professional developers, and simply curious idle readers can spend hours reading Hacker Noon’s stories — from the latest tech insights to articles on startups and programming. The platform provides a sleek reading environment, which it owes to JavaScript. Hacker Noon’s frontend architecture, based on JS, renders dynamic content and allows users to navigate articles and interact with comments and likes.
The Bottom Line
Whether your goal is to create a personal diary-style blog, a niche blog focused on a specific hobby, or a professional one to showcase your expertise, React JS offers all the functionality you need to bring your vision to life.
It is flexible enough to help you create visually stunning interfaces while being simple and pleasing for readers to interact with. Some of the most popular blogs like Reddit can’t do without JavaScript, and neither should you—get in touch with us and share your React JS project requirements.
At first, you might have difficulties using React. But once you get a bit further down this path, you’ll see React at its best: it offers reusable components, lightning-fast updates, and scalability.
Moreover, creating a successful blog means always keeping SEO front and center—and React JS is your golden ticket here. It will help you optimize page load time and rank your blog higher in search results.


